Download the proper version. If you are using Mac OS 10.3.x, you need Version 1.0.2. If you are using a Mac with an Intel processor, you need Version 1.1, which is a Universal Binary for Mac OS 10.4.x.
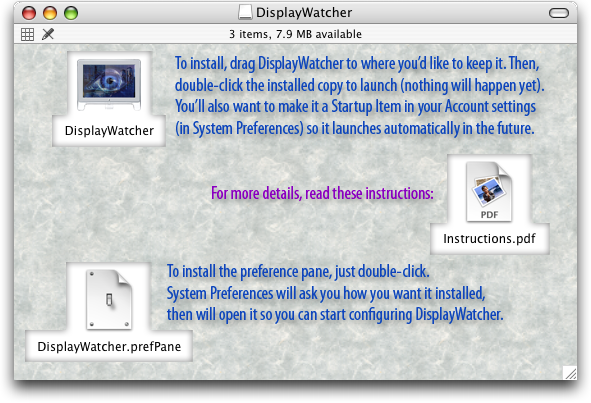
Once you've downloaded the disk image, it should open as a Finder window, as shown below:
There are a couple of steps you need to take to get it installed and configured on your own system.
DisplayWatcher itself is an application that runs invisibly in the background. You can put it anywhere on your disk that makes sense. Just drag the application to an appropriate folder. I have it in a utilities folder on my own system.
Once you've copied it to your drive, you can launch it, by simply double-clicking the installed copy in the Finder. (You don't want to launch the copy that's on the downloaded disk image, because then you won't be able to eject the image until you quit DisplayWatcher. And since it doesn't have a user interface, doing so is a little tricky, as described below.)
When you launch DisplayWatcher, you may be surprised to find nothing at all happening. No windows or menus appear, not even an icon in the dock. That's because its purpose is to run silently in the background, launching files when you switch to a recognized display configuration, or when your computer wakes up after sleeping. But when you first install it, you've not set up any files to be launched, so it won't do anything. You need to configure it, and since it doesn't have any interface of its own, that brings us to...
The configuration and settings of DisplayWatcher are managed using a System
Preferences pane. To install it, you can take advantage of help offered by
the System Preferences utility. You don't even need to copy
the file to your own hard drive. Simply double-click on the file DisplayWatcher.prefPane in
the mounted disk image and System Preferences will offer to install it for
you:
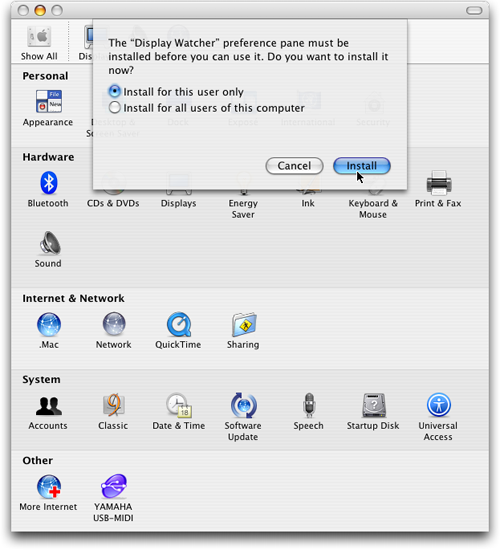
If you want multiple users to be able to set up their own DisplayWatcher settings,
choose the "all users" installation (which will put it in /Library/PreferencePanes).
More commonly, you'll install it just for yourself, which puts it in ~/Library/PreferencePanes.
Either way, once you click "Install", System Preferences will install and open
the pane for you, and you are ready for the next step.
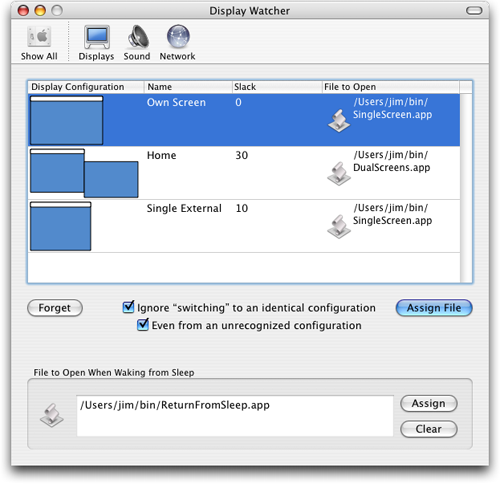
The first time you open the DisplayWatcher preference pane it will contain no file assignments. Each time you open it, the preference pane checks whether the current screen configuration matches any that it's seen before, and if not, it adds a new untitled entry for it. Since this is the first launch, there will be a single entry for your current screen configuration:

The "Display Configuration" column shows the relative sizes and positions of the displays in each screen configuration, as well as the location of the menu bar. This can help you recognize which one you're working with, but I'd still recommend clicking in the "Name" column and assigning a descriptive name as you create each configuration that you care about. It will help you distinguish them in the future, especially if you end up with some that differ only in resolution, which can't be seen in the picture.
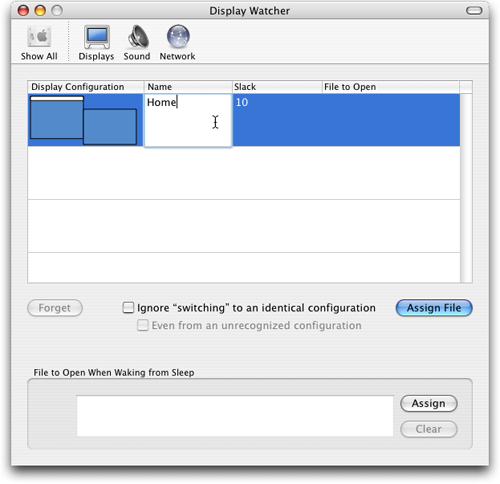
The "Slack" column controls the tolerance with which DisplayWatcher matches screen configurations. It allows monitors to be positioned up to that many pixels away from the arrangement in which they were found when the configuration was memorized. (The resolutions have to match exactly, though). This is useful in case your Mac ever forgets the arrangement that you use with a particular monitor when you plug back in to it, and forces you to manually recreate your preferred arrangement. That happens much less frequently than it did in the early days of Mac OS X, but if it ever does, you'll be glad you don't have to get it exactly right. I actually tend to use a slack of 30 for my dual-screen setup at home.
Finally, you need to tell DisplayWatcher what to do when it sees your Mac enter this screen configuration. Click on the "Assign File" button, and choose a file to be opened when the configuration is recognized.
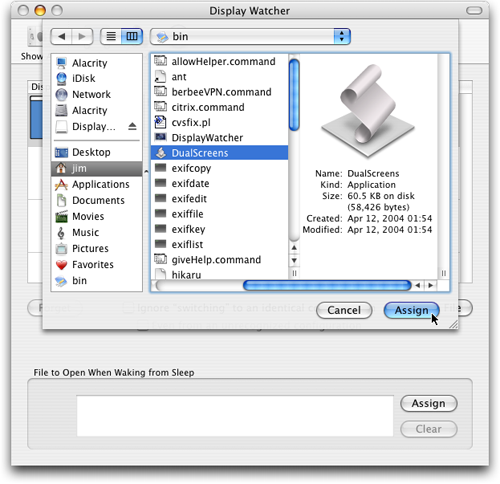
What kind of files does it make sense to have DisplayWatcher open? I find
that AppleScript applets are an ideal combination of power and convenience.
They can be used to change system settings, to tell scriptable applications
to perform tasks, and to execute shell scripts if I need to. If you've got
more of a Unix background and don't want to learn AppleScript yet, you can
save a shell script with the suffix ".command" and have DisplayWatcher
open that, which will cause it to be executed in Terminal. Or you could just
save it as a Unix executable script, and have it executed in the background.
Or you might have some other scripting environment or automation tool that you like to use. Anything that can be invoked by double-clicking on it in the Finder can be automatically launched by DisplayWatcher when it detects the appropriate monitor configuration.
If you haven't yet learned AppleScript, I'd suggest this is a good excuse to start. It's become quite powerful and fast in its current OS X incarnation, and the Script Editor has gained some very nice features too.
To round out the setup, change your display configuration to another one where you want things arranged differently, then switch back to the DisplayWatcher preference pane if needed. Assign names and the appropriate script, file or application to each configuration, and you're good to go! Try unplugging the external monitor, watch that script run, plug it back in and watch the other script run. Pretty neat, eh?
There are a couple other features in the interface worth explaining. Whenever you've selected a row that corresponds to a display configuration that isn't the current configuration, the "Forget" button will be enabled. If you click "Forget" and confirm the sheet that pops up, the highlighted row will be removed. If you're no longer using a particular configuration and don't want it cluttering up your interface, this is how to get rid of it.
The two checkboxes deal with some subtleties I didn't expect when I first started using the program. The "Ignore" checkbox tells DisplayWatcher not to launch the assigned file if your Mac reports that it has switched to a screen configuration that matches the configuration that was in effect before the switch. When would that happen? Well, suppose you changed the bit depth (color mode) of one of your displays. That triggers a configuration change event, but the resolution and arrangement are no different. I found it quite disconcerting to have my scripts run in that circumstance, so I added (and checked) this option.
If you play any games, you'll run into this issue a lot. And since they tend to also change the screen resolution on you while the game is running, I needed to add the second checkbox as well. When the game reduces the screen resolution, the Mac reports that it is switching to a configuration that DisplayWatcher hasn't memorized. That's fine, no script runs. But when the game ends, the Mac switches back to the prior screen configuration, which is recognized. I didn't want the script to run redundantly in that circumstance either, so I added (and checked) the second checkbox.
These options don't currently default to checked, but I suspect most people (at least people who play games) will want them on, so perhaps I should change the default.
Finally, the bottom section allows you to assign a file that will get launched whenever the computer wakes up from sleeping. My script sets up some SSH tunnels I always want, and then if Mail is running, sleeps for a bit and takes Mail back online so it can detect that the tunnels it needs are back up. The "Clear" button removes the wake-up file assignment.
In case you're working with AppleScript (or even just considering it), you can download the scripts I described above. They won't work unmodified on your system because they refer to paths and configuration files on mine (and I've changed the domain names of the hosts to which the ssh tunnels are established), but you can open them in Script Editor to get an idea of how they work, and the kinds of things you can do yourself. (Note: Since they're saved as applications, if you double-click them they will run rather than open for editing. To edit them, drag them onto Script Editor, or open them using its File menu.) O'Reilly has some online resources to help you get started with AppleScript, and the MacScripter BBS is a treasure trove of discussion that helped me get my own working.
If you're reading these instructions in the downloaded version
of DisplayWatcher rather than online, and want to be able to follow the hyperlinks,
you can find the online version at <http://www.brunchboy.com/dwInstructions.shtml>.
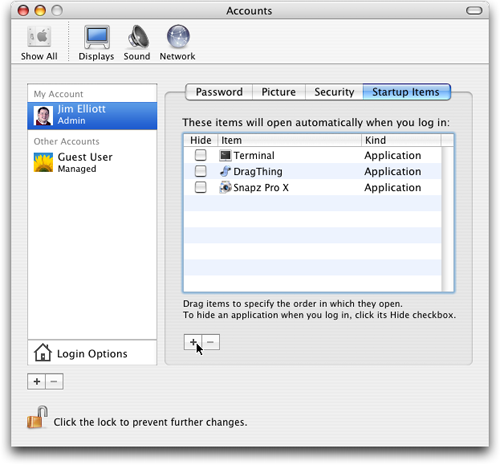
Once you've decided you like DisplayWatcher, you won't want to have to manually launch every time you restart your Mac (or log out and back in). You can use the Startup Items feature of Mac OS X to do it for you. Open System Preferences again if you've closed it, and go to the Accounts preference pane (in the System section). Select your account and switch to the Startup Items tab. Click the "+" below the list of startup items to add a new one:
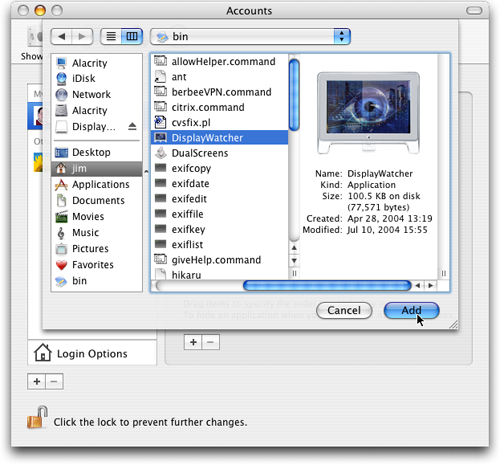
Navigate to where you've installed DisplayWatcher, and add it:
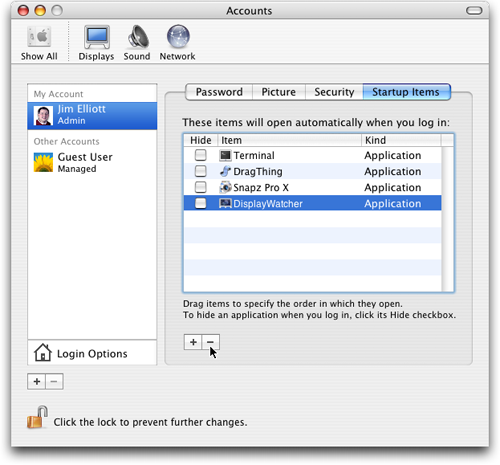
Now DisplayWatcher will start automatically whenever you log in. If you ever want to stop this happening, just come back to this same preference pane tab, select DisplayWatcher and click the "-" button to remove it.
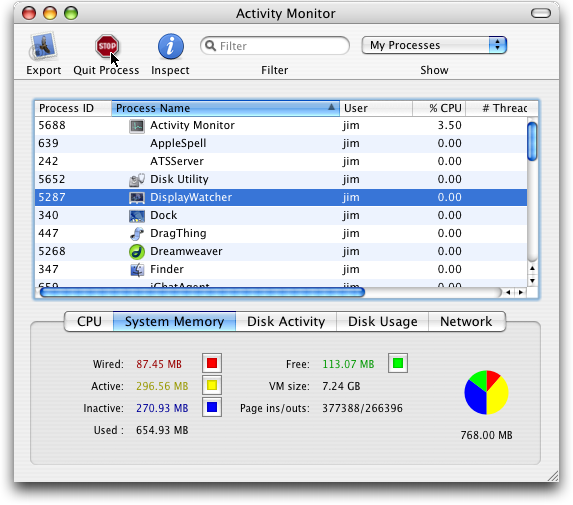
If, for some reason, you want DisplayWatcher to exit, the easiest way to tell
it to quit is to use Apple's Activity Monitor. You'll find
it in the Applications -> Utilities folder. Launch it, and you'll be able
to see whether DisplayWatcher is running. If it is, and you want to shut it
down, highlight it and click on the "Quit Process" button:
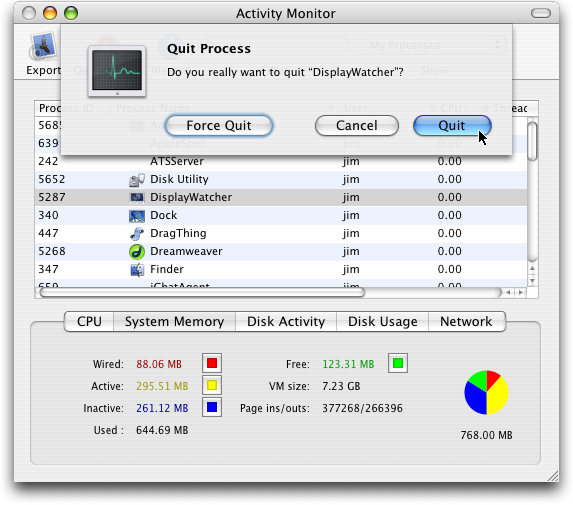
Activity Monitor will ask you for confirmation. You can use the regular "Quit" button or press Return; there's no need to use "Force Quit":
Once you click on Quit, DisplayWatcher will stop running until you launch it again, or until the next time you log in (if you've got it set up as a Startup Item).
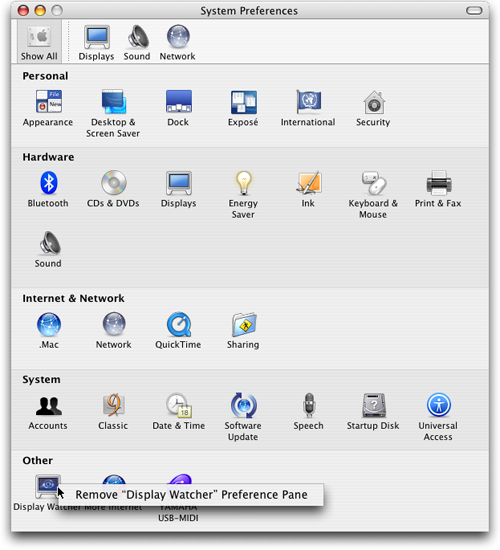
If you're done with DisplayWatcher and want to get rid of it, basically reverse the process you followed to install it. First, if it's running, tell it to quit as described above. Then, drag the DisplayWatcher application into the trash. If you want to be graceful about it, you can also manually remove it as a Startup Item for your Account. You'll want to launch System Preferences anyway to remove the DisplayWatcher preference pane.
Simply control-click on the DisplayWatcher icon in System Preferences, and choose to remove the preference pane. It will be uninstalled for you:
|
This page was last modified
Wednesday, 15-Jun-2022 03:41:39 UTC.
Return to Home Page. |
||
|
|